I need help understanding how to upload photos to Google Drive. I tried using the app but couldn’t figure out the steps. Could someone explain the process or share tips to make it easier?
The Complete Guide to Uploading Photos to Google Drive
So, you’re planning to upload some pictures to Google Drive? No worries! Whether you’re on a computer or using your smartphone, here’s a step-by-step guide tailored to your needs.
 From Your Computer
-
Access Google Drive
Head over to Google Drive on your favorite browser or, if you love keeping things tidy, download the Google Drive desktop app. Log in with your Google account credentials, and you’re ready to roll. -
Upload Your Files
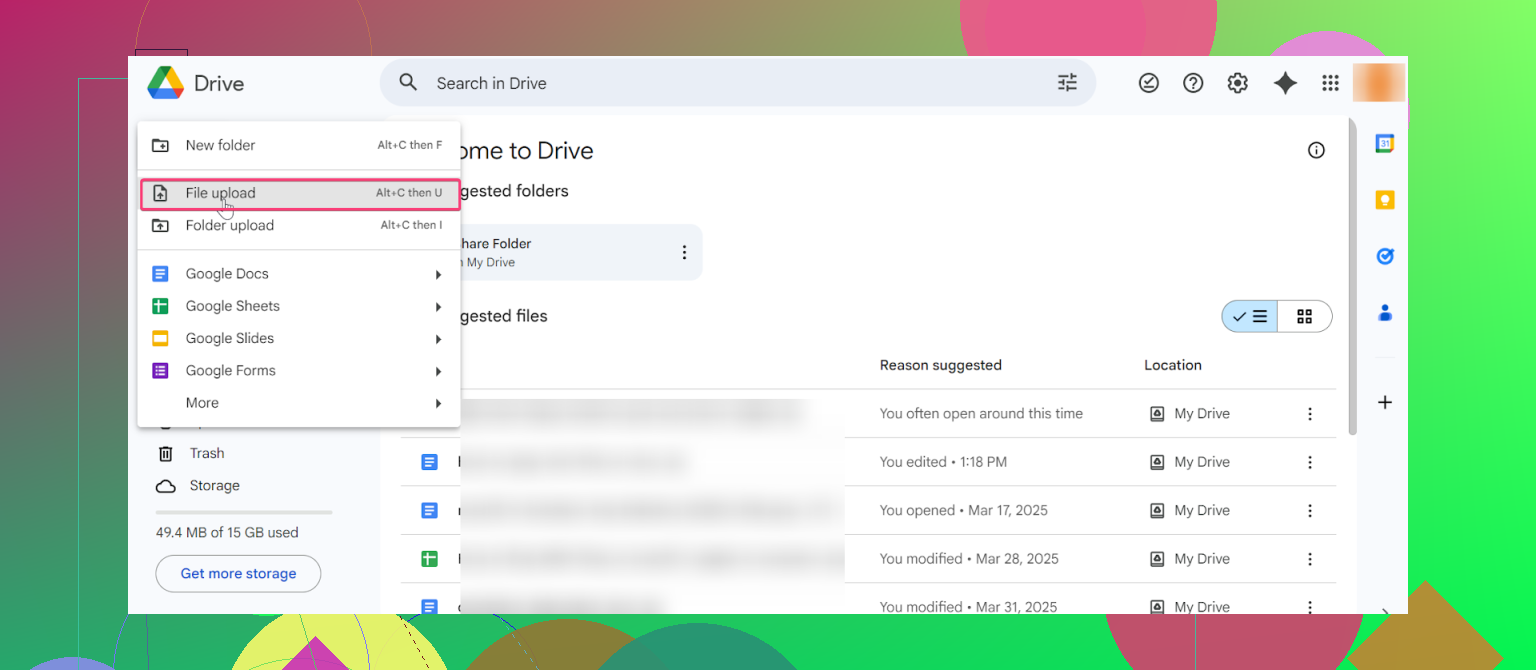
- On the Drive interface, locate the “+ New” button in the upper-left corner.
- Choose either:
- “Upload File” if you want to add individual photos.
- “Upload Folder” if you want an entire collection to keep your albums intact.
- Browse for your files or folders on your computer, click Open, and voilà! The upload will begin.
 From Your Smartphone
-
Launch the App
Open up the Google Drive app on your phone. If you don’t already have it installed (shocking, isn’t it?), just head over to your phone’s app store and download it. -
Upload Your Images
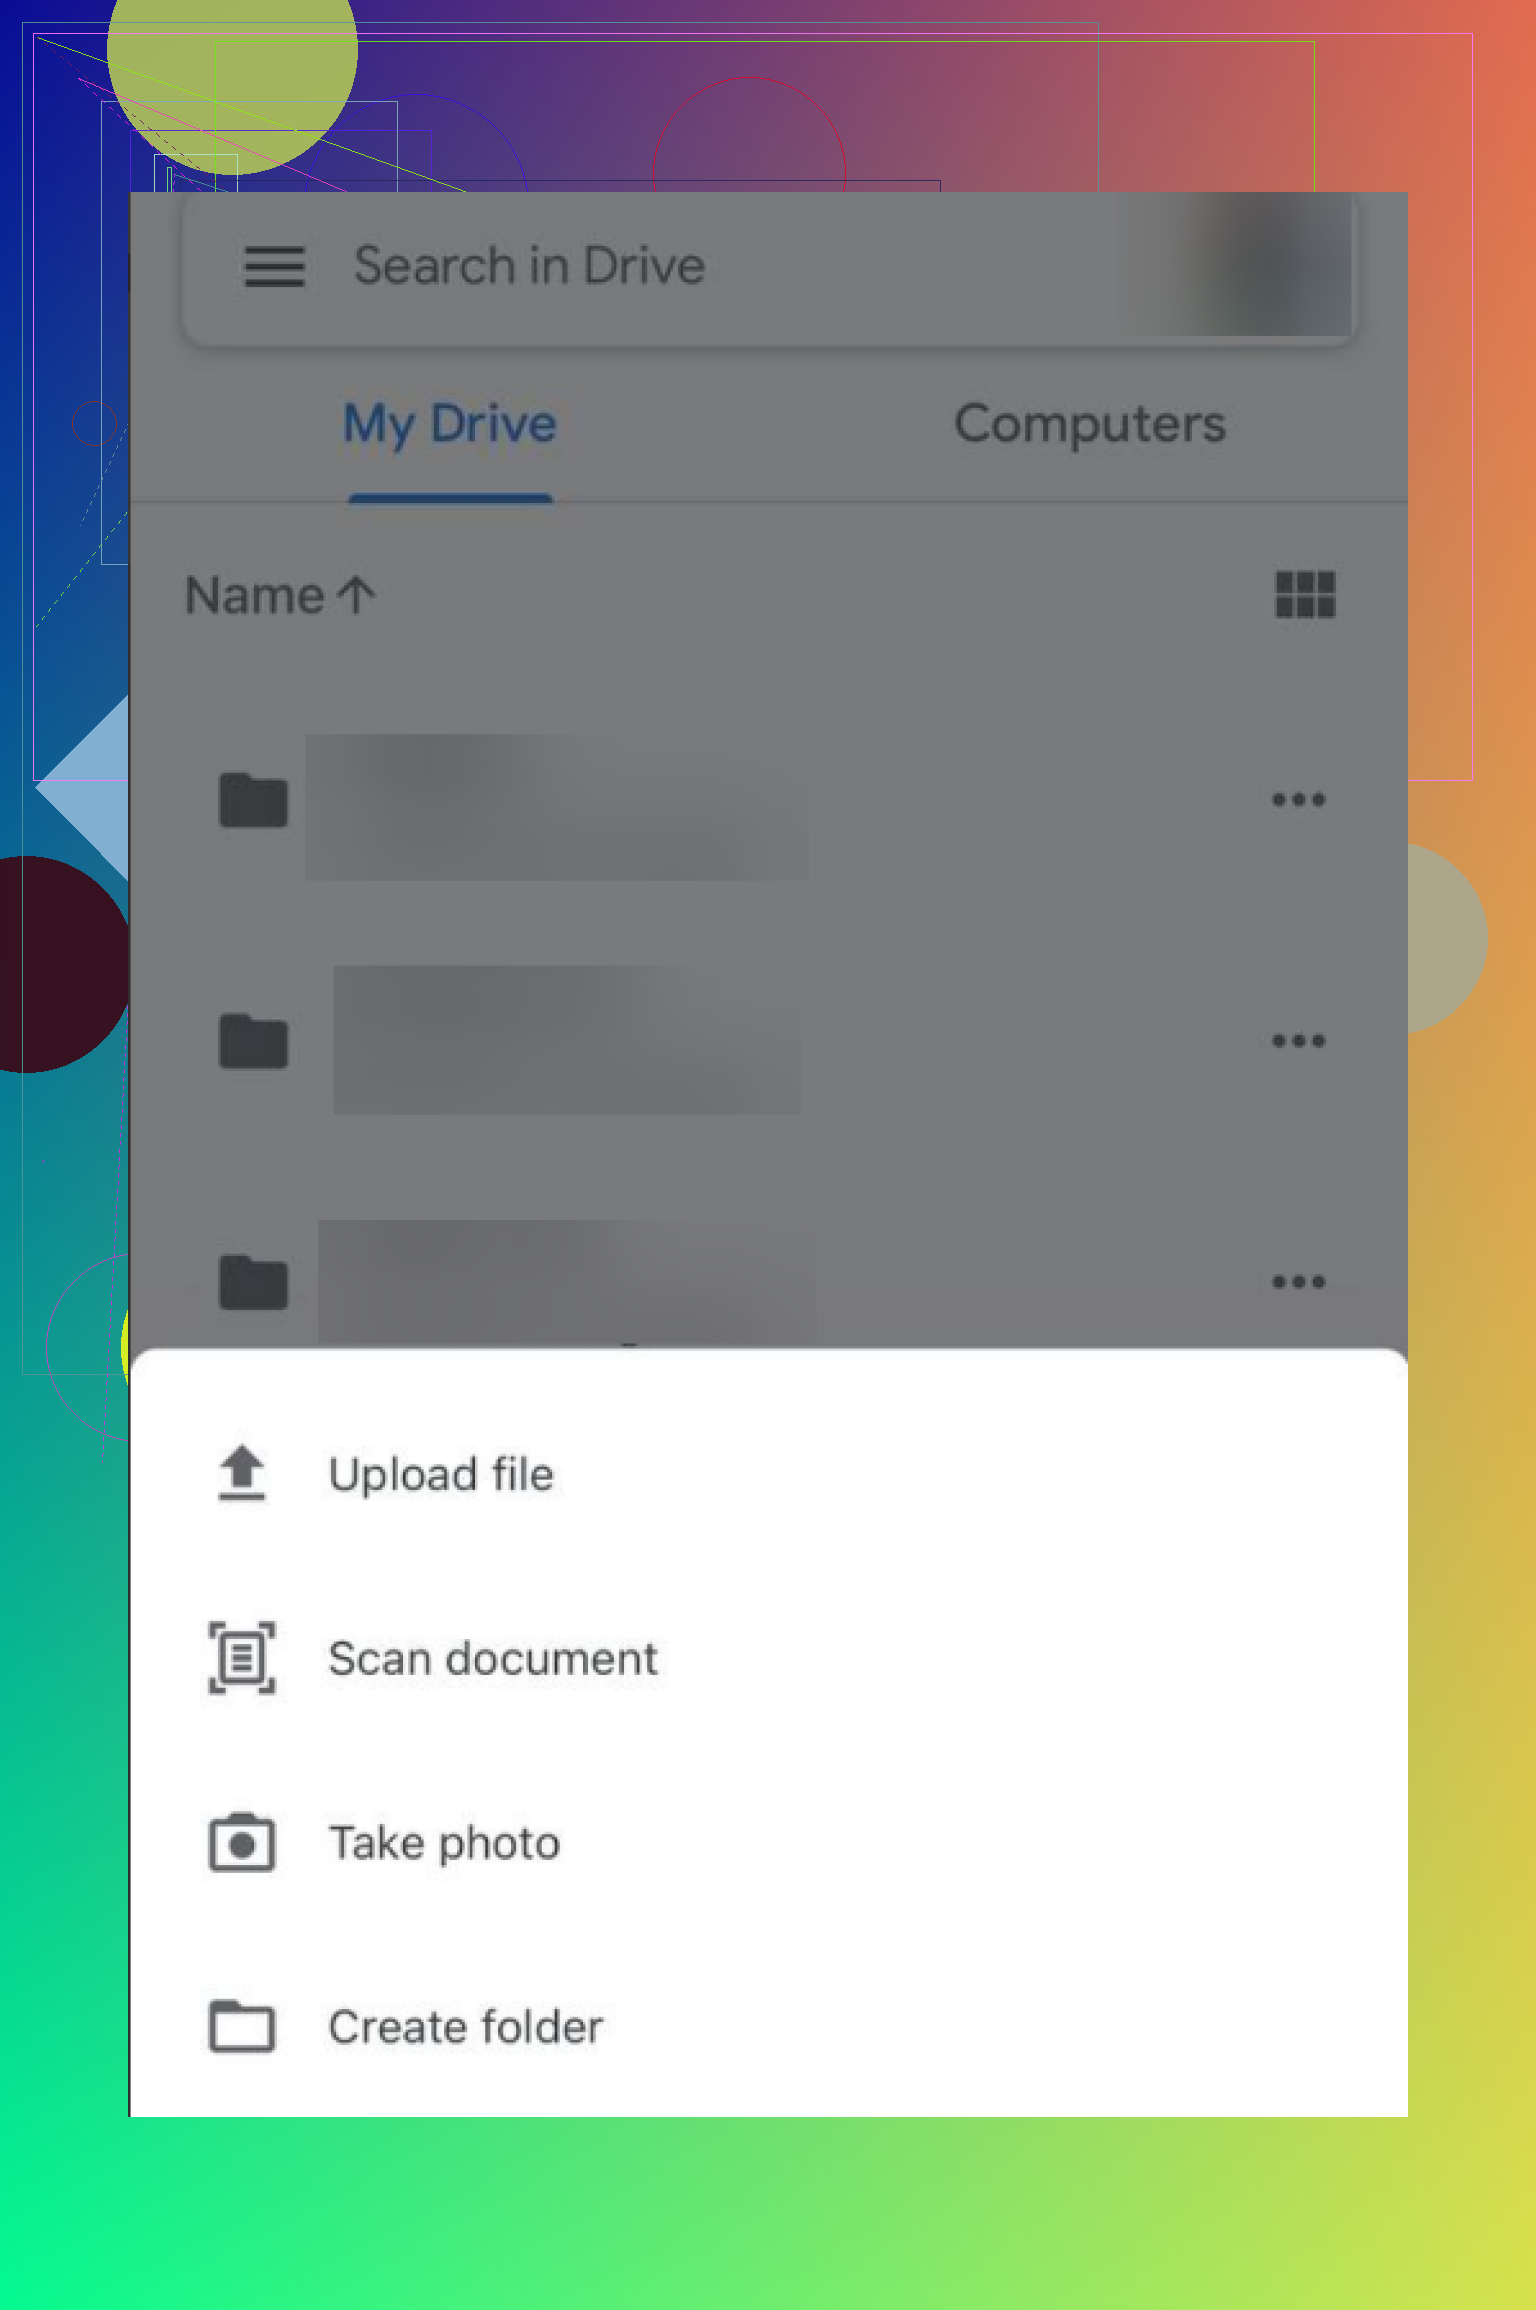
- Tap the “+” button—typically located at the bottom right of the screen.
- Choose the “Upload” option.
- Select the pictures you want from your gallery or folders, and Drive will handle the rest, syncing your photos to the cloud.
 Want Hassle-Free Backups? Meet Google Photos!
For those who want to preserve every memory automatically without clicking upload every time, Google Photos has you covered. Once you download the Google Photos app:
- Go to Settings > Enable “Backup & Sync”.
This handy little tool ensures your photos effortlessly find their way to Google’s cloud storage. No manual uploads needed. Pure magic.
 Taking It Up a Notch with CloudMounter
Now, let’s level up your experience. While Google Drive works brilliantly, sometimes having a dedicated tool can make life even smoother. Enter CloudMounter.
What’s so special about it?
-
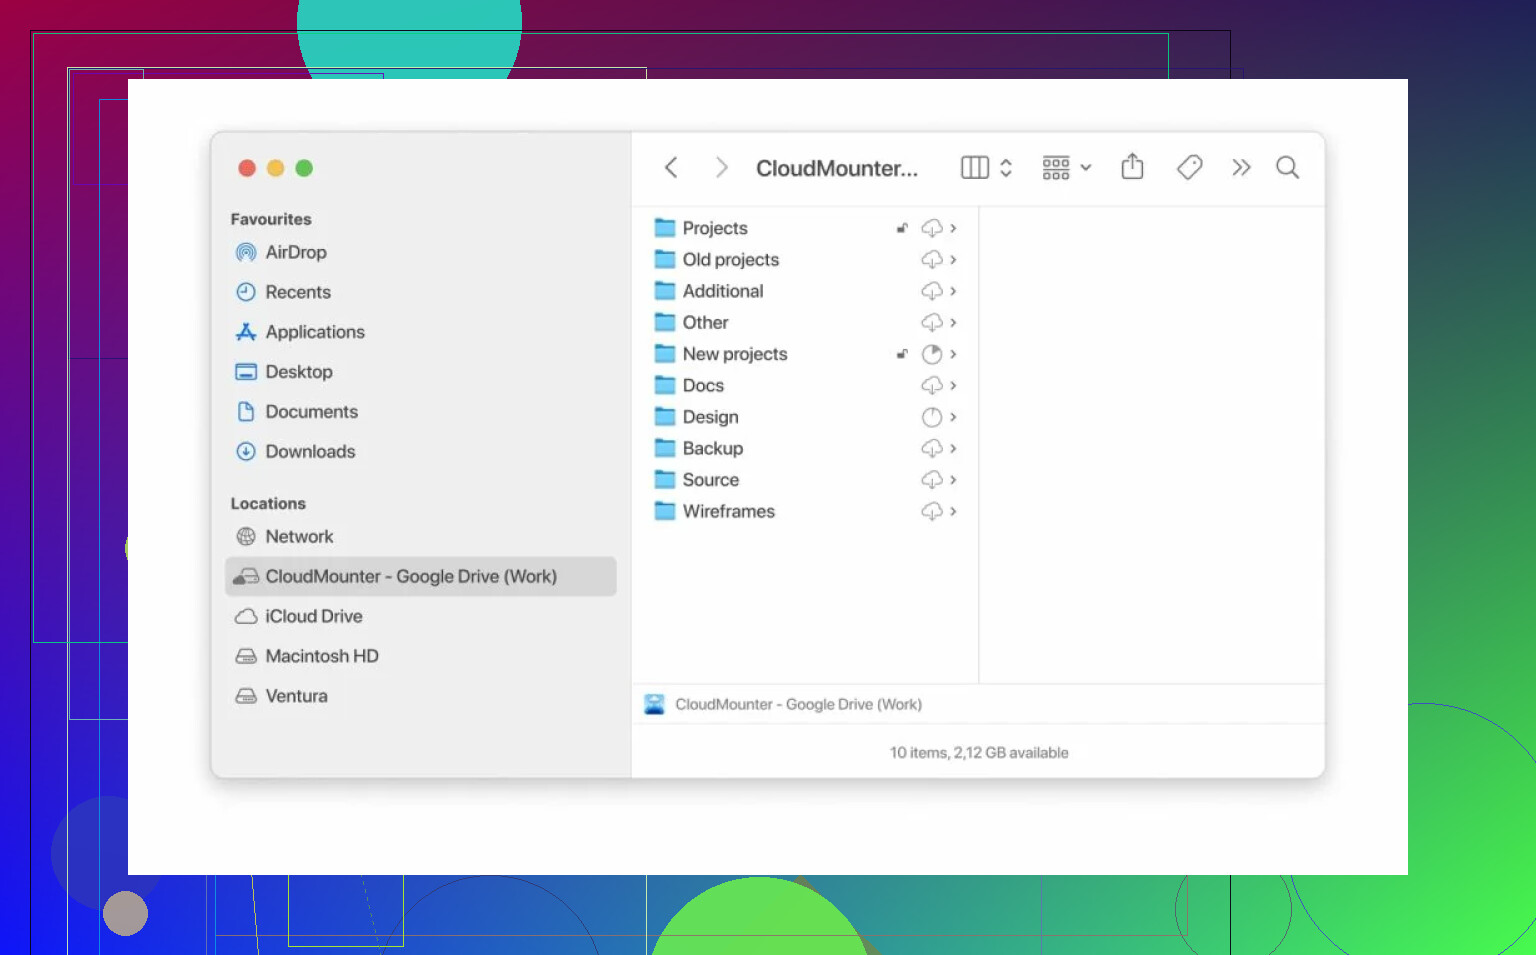
CloudMounter integrates your Google Drive as a local disk on your device. This means you can upload files directly without hogging computer storage space.
-
It’s also an excellent choice for handling massive files like high-res images or videos, as the stress of dealing with storage limitations is significantly reduced.
-
Oh, and they prioritize security. Your data gets an extra coat of protection, ensuring your memories stay pristine and uncorrupted.
Want to know more about CloudMounter and how it works? Check out their official guide here.
Wrapping Things Up
There you have it, three easy approaches to upload and store your photos on Google Drive or even go beyond with tools like CloudMounter. Whether you’re backing up memories, managing your creative projects, or simply organizing your shots, these solutions keep things simplified, efficient, and secure. Your memories deserve nothing less!
22 Likes
Uploading photos to Google Drive might feel a bit cumbersome at first, but hey, we’ve all been there. It’s not rocket science, though, so let me break it down differently without repeating what @mikeappsreviewer already mentioned (btw, interesting insights from them, but let’s twist it up a bit).
First things first: why stick to Google Drive?
If you’re someone who loves simplicity, then sure, Google Drive is decent, but it’s clunky when managing large photo libraries. Their UI isn’t as glamorous as some of us might want. Have you considered trying something like automatically mounting your Google Drive as a local disk? Tools like organizing your cloud storage efficiently can take away the pain of manually uploading every dang thing.
Let’s talk alternatives to manual uploads
Instead of clicking through the app aimlessly—trust me, we’ve all raged at that blank interface before—enable the Backup and Sync feature on your desktop (or the Google Photos approach @mikeappsreviewer mentioned). I know this feels like an extra step, but it’s worth your time. Plus, it saves you from the headache of navigating folder after folder just to find photos.
- Download and sign into Backup and Sync from Google (I get it—downloads suck, but this one is okay).
- Set up “syncing preferences,” selecting the folders (or even your camera roll) to auto-upload to Google Drive.
- Done. Sit back while the cloud works its magic.
Still not seamless enough for ya? Then skip Google Drive entirely for your photos and just use Google Photos with ‘Backup & Sync’ turned on—it syncs like it’s on steroids.
A Little Critique on the App Experience:
Okay, personal gripe here—the Google Drive app could be waaaay more user-friendly. Who puts the upload button smushed at the bottom like that? Anyway:
- Open the app.
- Find the bottom-right + button (as if it’s hiding from you).
- Tap Upload, and then choose photos.
Simple, right? Meh, not really, but that’s just what we have to work with unless Google’s designers gift us a miracle UI.
My Offbeat Opinion: Consider Cloud Integration
Look, if manually adding photos one by one sounds like watching paint dry (which it is), you NEED to try tools like CloudMounter. This snazzy app mounts your cloud storage (yep, including Google Drive) as a virtual disk on your computer. Translation? You drag-and-drop files the same way you do between local folders. Handy for big ol’ photo albums, no? Find out more about simplifying file uploads with CloudMounter and never look back at Google Drive’s app clunkiness again.
So while Google Drive isn’t perfect, following these more automated routes can save you frustration. And hey, if all else fails—you know where to vent about it (here ![]() ).
).
Ugh, Google Drive—such a blessing and a curse at the same time, am I right? Honestly, using the app to upload photos can sometimes feel like trying to crack the Da Vinci Code, but let’s break it down even further because, clearly, the steps aren’t intuitive for everyone. I see @mikeappsreviewer and @reveurdenuit already dropped some golden info, but here’s my slightly different take.
Why Are We Still Doing This the Hard Way?
First off, can we agree that manually uploading photos is pure drudgery? I mean, sure, press the “+ New” or Upload button and dig through your files or gallery, but who wants to spend hours babysitting uploads? If you’re like me, you probably didn’t sign up to play personal assistant to Google’s clunky interface. But fine, if you must use the basics:
Quick Desktop Hack
Skip the browser altogether, download Google Drive’s desktop app (Backup and Sync). Why? It’s easier to drag and drop photos from your computer than to fumble through menus and buttons in the browser. Just drag folders, select auto-sync options, and you’re good. No human intervention required. You might actually find time to binge your favorite show while your photos sync on autopilot.
About That App Experience
If you’re on mobile, navigating Google Drive can feel like it was designed by someone who hates convenience. The upload button is tucked away in the bottom-right corner like it’s in witness protection. Tap that elusive “+” button, tap Upload, and then you’re finally on your way. Tedious but functional, I guess. Make sure your app permissions are solid though—no one wants to figure this out, press upload, and get hit with a “permission denied” message.
Oh, and if the Google Drive app annoys you too much, switch to something smarter, like Google Photos. Set up Backup & Sync there, and boom—photos will upload automatically without you lifting a finger. Trust me, it’s life-changing (and sanity-saving).
How to Streamline This Process Even More
Now, if you’re handling a massive collection of photos or videos, things get dicey. That’s where tools like seamlessly managing your storage come in handy. With this app, you can mount your Google Drive as a local disk on your computer. What does that mean? It’s like having an external hard drive—but in the cloud. You just move your files like you would with any ordinary USB drive, except it uploads directly to Drive in the background. No browser hassle, no upload errors.
Not only does it save time, but it also simplifies working with massive high-res photos or videos. Plus, you’re not filling up your device storage with Google Drive syncing EVERYTHING. Trust me, your hard drive will thank you.
Skipping Google Drive Altogether?
Here’s a controversial thought—just use Dropbox or OneDrive. Don’t @ me, but their interfaces for photo uploads are way more user-friendly. Less clicking, more dragging and dropping. If you’re losing hair over Google Drive’s quirks, there’s no shame in exploring other cloud options. I’m just sayin’.
So yeah, TL;DR: Google Drive “works,” but make your life easier with tools like Backup and Sync, Google Photos, or even integrating cloud storage effortlessly. Or better yet, skip the hassle, automate uploads, and live your best cloud life.
So, let’s mix things up a little. Everyone’s already laid out the basics, but let me throw in a few alternative angles for handling Google Drive uploads. I’m all for options because, let’s face it, no system is perfect.
First: Is Google Drive Really the Best Option Here?
Real talk—that interface can legit feel like taking a wrong turn in a labyrinth. Sure, @mikeappsreviewer’s suggestion to use the desktop Backup and Sync app seems solid, but the constant syncing can become a storage hog really quickly if you’re not careful. It’s nice to drag and drop, but not when it eats up local space on your computer. And the manual mobile upload process mentioned by @reveurdenuit? Yeah, doable, but super clunky for frequent backups. Just saying.
CloudMounter: The Friend You Didn’t Know You Needed
Look, CloudMounter’s integration with Google Drive changes the game IF your priority is managing large files without maxing out your local storage. Here’s why it’s worth considering:
- Pros: You can basically treat your Google Drive as an external hard drive. No storage hogging, super user-friendly interface, and excellent for managing high-res photo collections (seriously, photographers, take note). Bonus points for its encryption features.
- Cons: It’s not free. If you’re just a casual user uploading a few photos here and there, the cost might be hard to justify unless you love the extra convenience. Also, while it’s super polished, it might feel like overkill if all your uploads are small fries.
Not ready to dive in? Alternatives like Cyberduck or ExpanDrive are worth a look, but CloudMounter edges ahead for its cleaner UI and security focus.
What About Full Automation?
Here’s my hot take: Skip Drive uploads entirely for photo backups and go Google Photos all the way. Both @espritlibre and @mikeappsreviewer hit the nail on the head—Backup & Sync is the real MVP if you want hands-off uploading. Once you enable it, every single photo you click goes to the cloud without you lifting a finger. No upload buttons, no app digging, nada. The downside? It’s limited to photos and videos. For mixed files or folders, you’re still at Google Drive’s mercy.
But Maybe Google Isn’t Your Forever Choice?
Okay, hear me out—Dropbox, OneDrive, or even iCloud can absolutely smoke Drive when it comes to simpler, more intuitive photo upload processes. Dropbox, especially, is seamless with its desktop app. I know we’re all married to Drive because it’s free (mostly), but does anyone else find it a bit… frustrating at times? Just me? Cool.
Mobile Pain Points
A quick side note: If you’re struggling on Android or iOS, try uploading through your device’s native file manager instead of the Google Drive app. It’s sometimes smoother—and faster!—than waiting for Drive to wake up and process your taps. Again, pros for Google Photos come into play here if you don’t want to go through this dance every time.
Final Takeaway
Yes, Google Drive works well with practice. But why settle for “well enough” when there are tools (CloudMounter ![]() ) that take the stress out of the process and keep storage efficient? If you’re juggling tons of files, invest in something that’ll save you time and energy. Otherwise, automate with Google Photos or check out alternatives like Dropbox for less hassle.
) that take the stress out of the process and keep storage efficient? If you’re juggling tons of files, invest in something that’ll save you time and energy. Otherwise, automate with Google Photos or check out alternatives like Dropbox for less hassle.
PS: Let’s all agree that manually uploading is so 2015.